

How To Change The Color Of Your Home Bar Wwindows

On Windows 11, yous tin customize many settings to change the desktop's appearance and other elements to make the experience a petty more than personal or apace refresh the feel to avoid the same look every day.
Although the experience is non equally customizable as on Windows x, you tin can still change the desktop background with a personal picture or a theme from the Microsoft Store. You tin switch betwixt the dark and light color modes or use a custom emphasis color across the desktop. Y'all tin organize your favorite apps in the Kickoff menu. And you can alter the alignment of the Taskbar, make up one's mind what items appear in the experience, tweak the system tray settings, and a lot more.
In this Windows eleven guide, we volition walk you lot through the different ways to customize the appearance to brand your computer experience a little more personal.
- How to modify background on Windows 11
- How to change colors on Windows 11
- How to alter themes on Windows 11
- How to customize Kickoff bill of fare on Windows eleven
- How to customize Taskbar on Windows 11
- How to customize Lock screen on Windows xi
How to change background on Windows eleven
On Windows xi, the quickest fashion to make the desktop look different is past changing the groundwork image, configuring a slideshow, or choosing a solid background color. If y'all are using the virtual desktops feature, it'south now possible to set a custom background for each desktop.
Modify desktop wallpaper
To alter the desktop background on Windows 11, use these steps:
- Open Settings.
- Click on Personalization.
- Click the Background page on the right side.
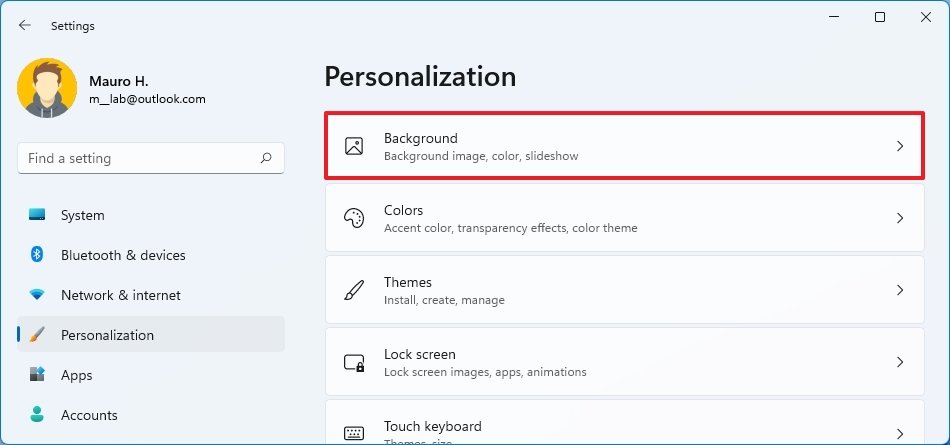
- Nether the "Personalize your background" setting, select the Picture option.
- Click the Browse photos push button.
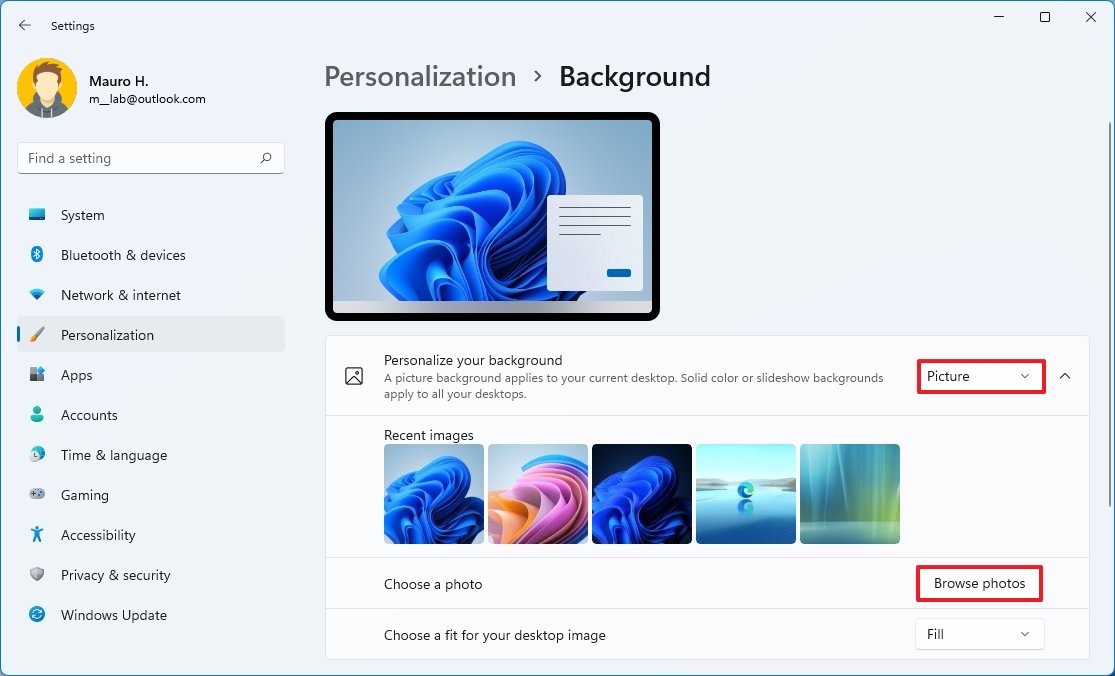
- Select the background image to use on the desktop.
- Click the Cull picture push.
- (Optional) Use the Choose a fit for your desktop image setting and select the Fill choice to ensure the prototype covers the entire screen. Other options include Fit, Stretch, Tile, Eye, and Span.
Alternatively, y'all can likewise right-click an prototype and select the Set as desktop background option to apply the image as the new desktop background.
Configure desktop slideshow
To gear up a slideshow on the desktop, employ these steps:
- Open Settings.
- Click on Personalization.
- Click the Groundwork page on the right side.
- Under the "Personalize your groundwork" setting, select the Slideshow option.
- Click the Browse button.
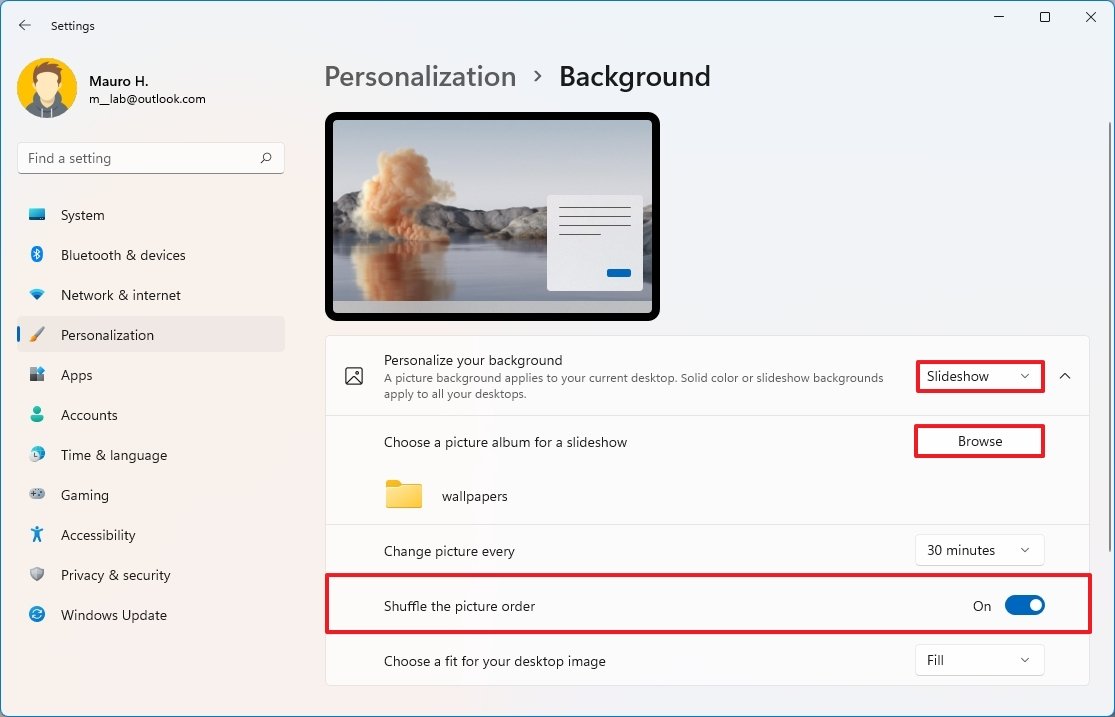
- Select the binder with the images to show on the desktop.
- Click the Choose this folder push.
- Use the Alter picture every setting and select how often to rotate images. Options include i, 10, or 30 minutes, one or six hours, or one solar day.
- (Optional) Turn on the Shuffle the picture show order toggle switch.
- (Optional) Use the Cull a fit for your desktop epitome setting and select the Fill up option to ensure the image covers the entire screen. Other options include Fit, Stretch, Tile, Center, and Span.
Once you complete the steps, the desktop will rotate the collection of pictures in the background at the intervals you specified in the settings.
Configure desktop solid color
To apply a solid colour on the Windows xi desktop, utilize these steps:
- Open up Settings.
- Click on Personalization.
- Click the Background page on the right side.
- Under the "Personalize your background" setting, select the Solid color pick.
- Select a background color.
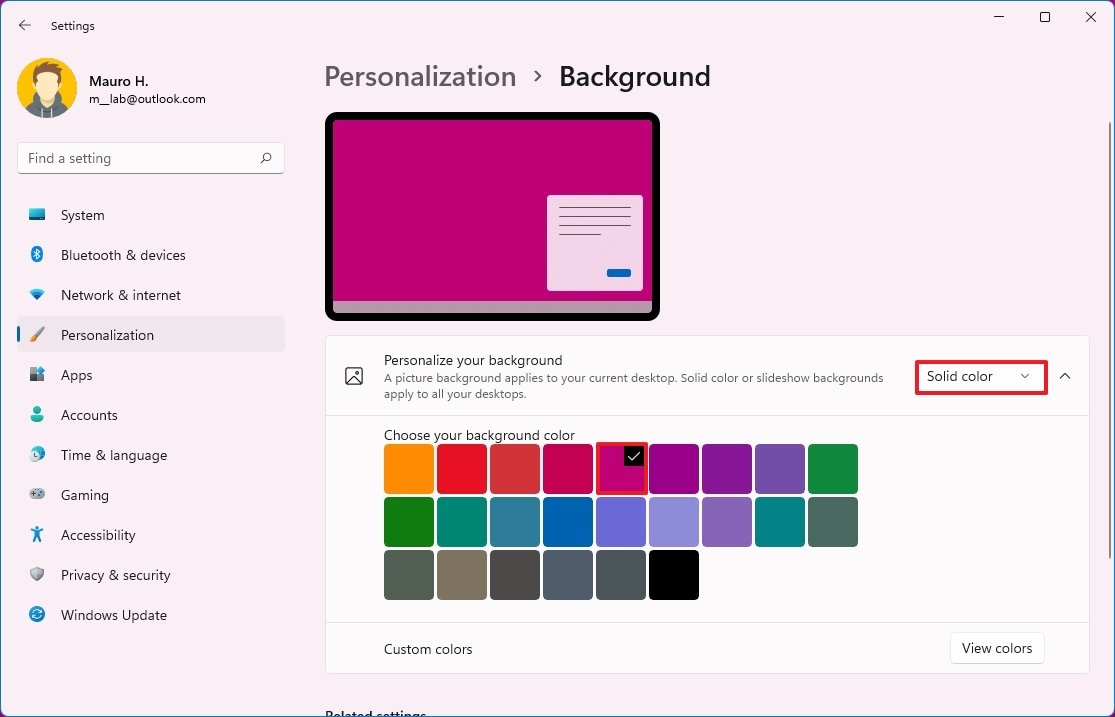
- (Optional) Under the "Custom colors" setting, click the View colors push button.
- Create a custom colour.
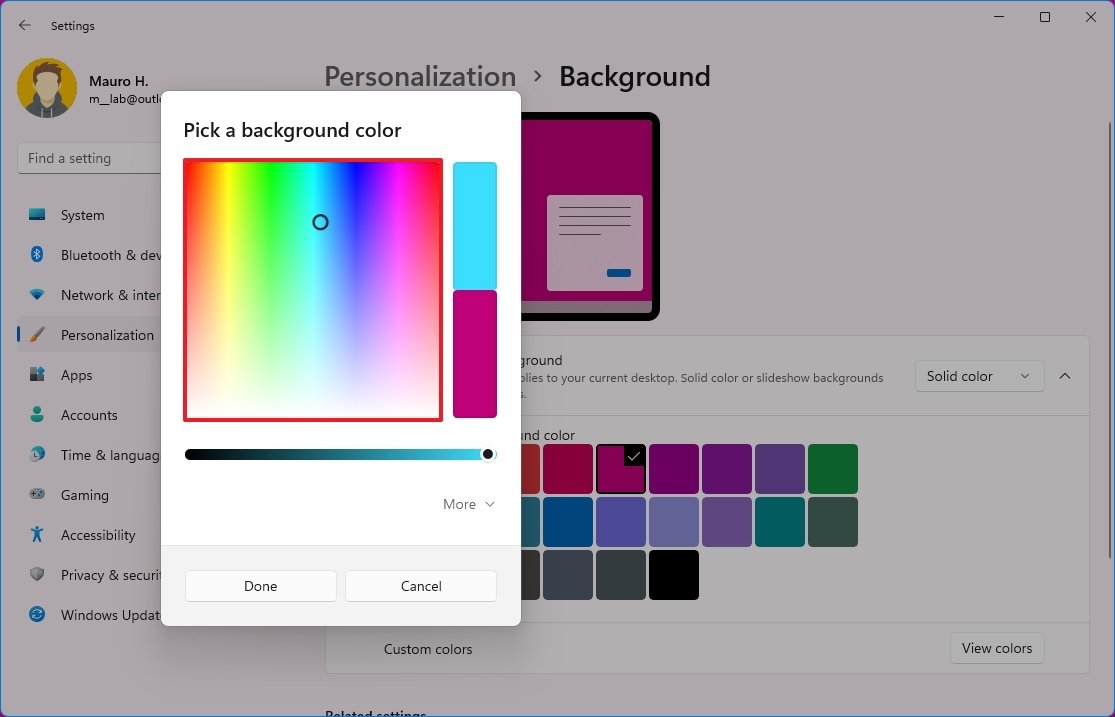
- Click the Done button.
After y'all complete the steps, the desktop will show a solid color background.
Configure groundwork per desktop
On Windows 11, it's likewise possible to set a different background for each virtual desktop to get in easier to differentiate between them.
To set a different groundwork per desktop (not monitor), utilize these steps:
- Open up Settings.
- Click on Personalization.
- Click the Background folio on the right side.
- Nether the "Personalize your background" setting, select the Moving picture option.
- Right-click the prototype, select the Set up for desktop submenu, and select the desktop to utilize the groundwork.
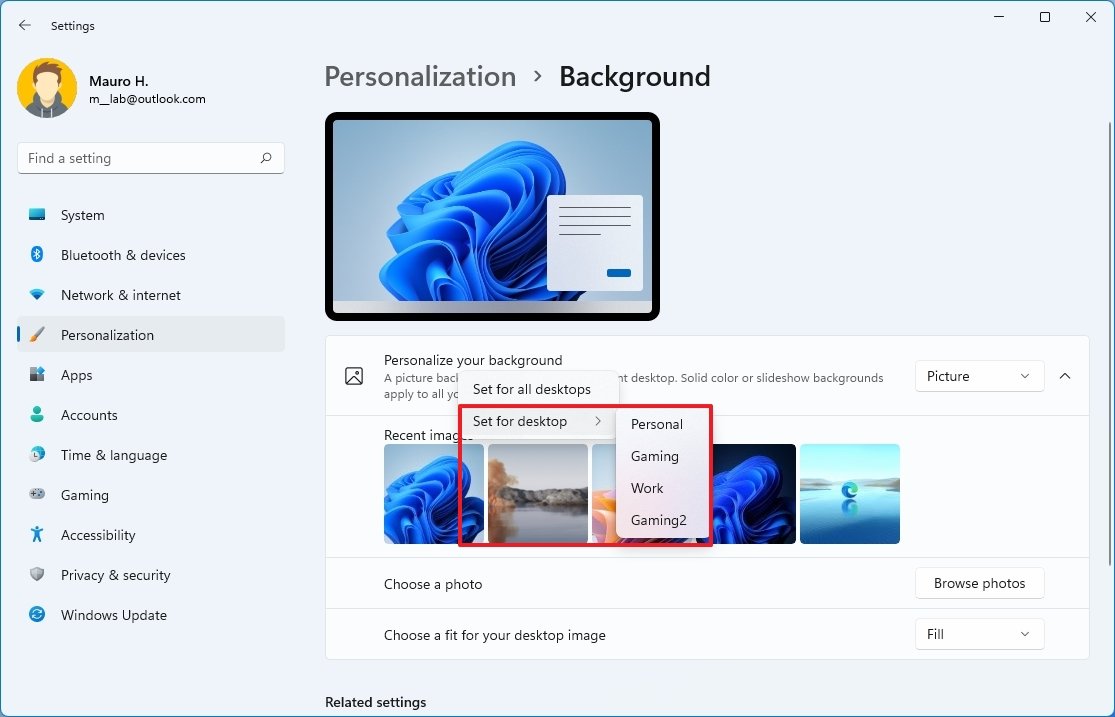
Once you consummate the steps, each virtual desktop will include a different desktop background.
Configure background per monitor
You can likewise gear up a different background epitome per monitor. Still, the selection won't exist available while using virtual desktops.
To set up a custom background per monitor on Windows 11, use these steps:
- Open Settings.
- Click on Personalization.
- Click the Groundwork folio on the correct side.
- Nether the "Personalize your background" setting, select the Moving-picture show option.
- Right-click the epitome, select the Assail monitor (Northward) option.
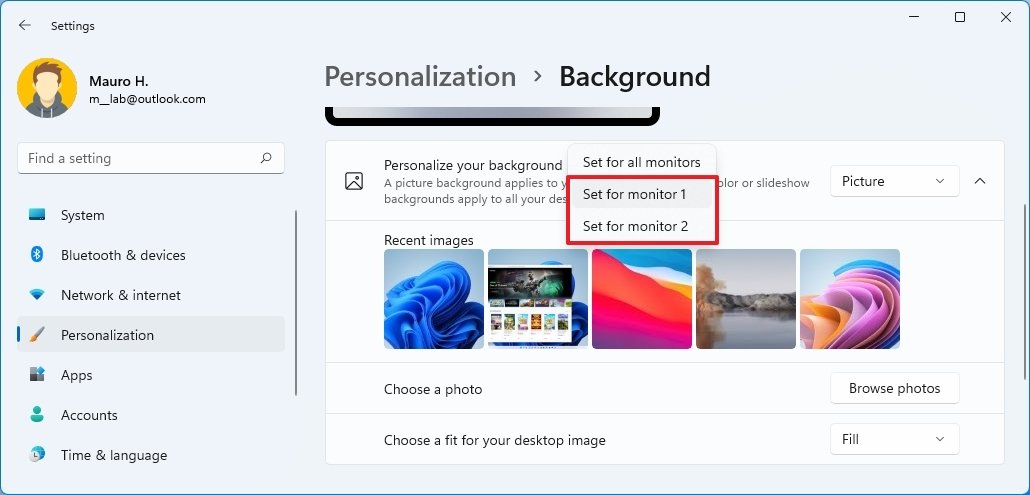
After yous consummate the steps, you may need to repeat the instructions to apply some other image to the remaining displays.
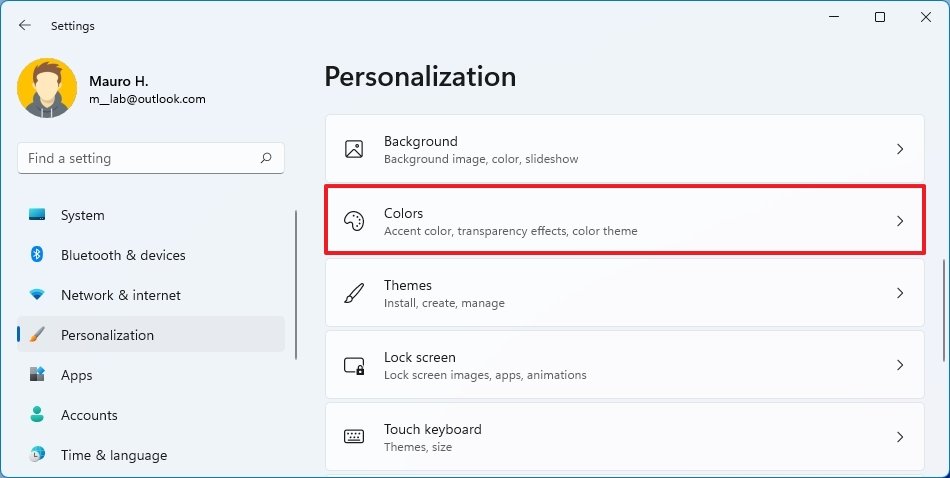
How to alter colors on Windows xi
Windows eleven lets you choose different colors for elements across the desktop. You tin choose between the calorie-free or dark mode, or you lot tin select a custom accent color that will appear in the Start menu, Taskbar, Notification Center and Quick Settings, title confined, borders, and apps.
Enable light or dark color mode
To switch betwixt the dark or light system on Windows 11, utilise these steps:
- Open Settings.
- Click on Personalization.
- Click the Background folio on the right side.
- Use the "Cull your style" setting and select the Light or Dark colour way option.
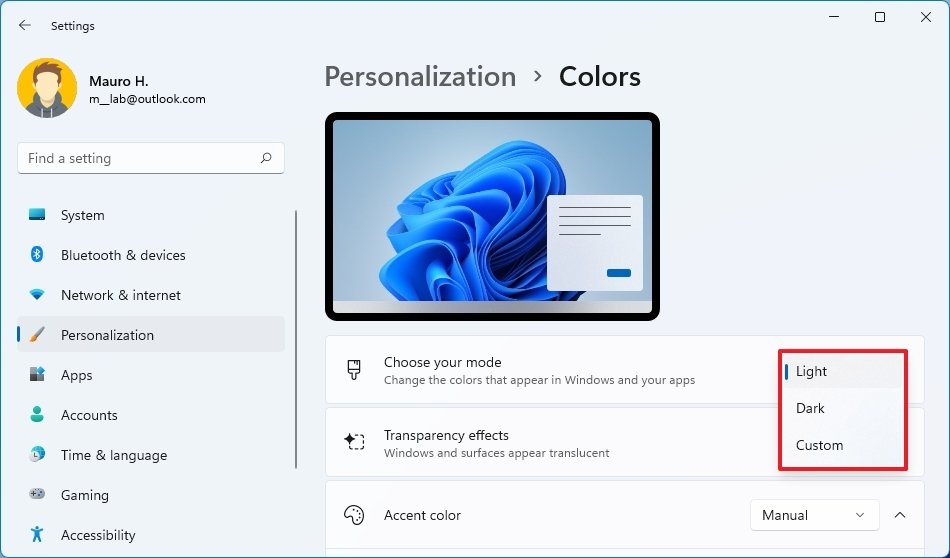
After you complete the steps, the desktop feel (including Taskbar, Start menu, and apps) will switch to the color mode you selected.
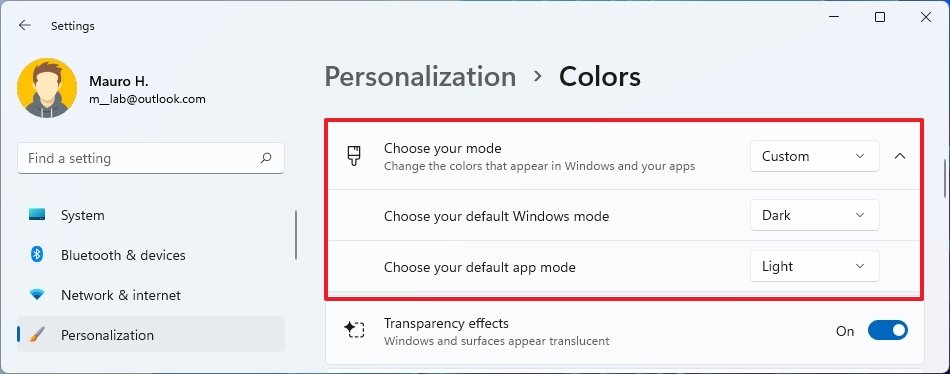
Configure custom colour mode
To apply a custom system color way, apply these steps:
- Open up Settings.
- Click on Personalization.
- Click the Background page on the right side.
- Use the Cull your mode setting and select the Custom color manner option.
- Utilise the Cull your default Windows mode setting to decide if Start, Taskbar, and other elements should apply the light or night color fashion.
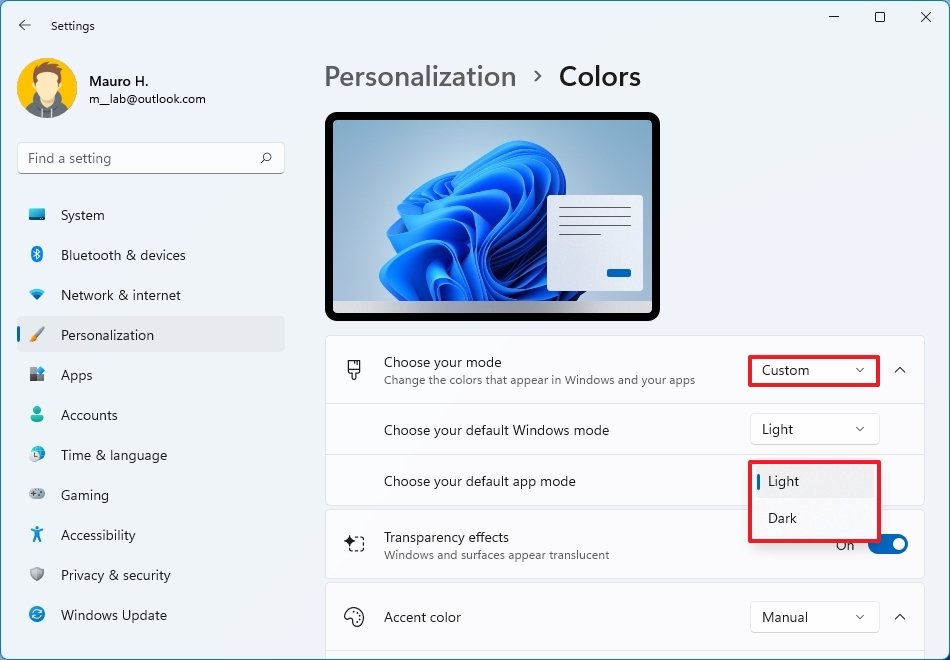
- Employ the Choose your default app mode setting to make up one's mind whether apps should use the light or night color mode.
Later you complete the steps, the custom color mode volition apply on Windows 11, depending on your configuration.
Enable or disable transparency upshot
Some elements like the Starting time bill of fare, Taskbar, Quick Settings, Notification Center, and apps can show semi-transparency effects, and in the "Colors" page, y'all can determine whether or not to employ these furnishings.
To configure transparent effect on Windows 11, use these steps:
- Open up Settings.
- Click on Personalization.
- Click the Colors page on the right side.
- Utilise the Choose your mode setting and plough on or off the Transparency effects toggle switch.
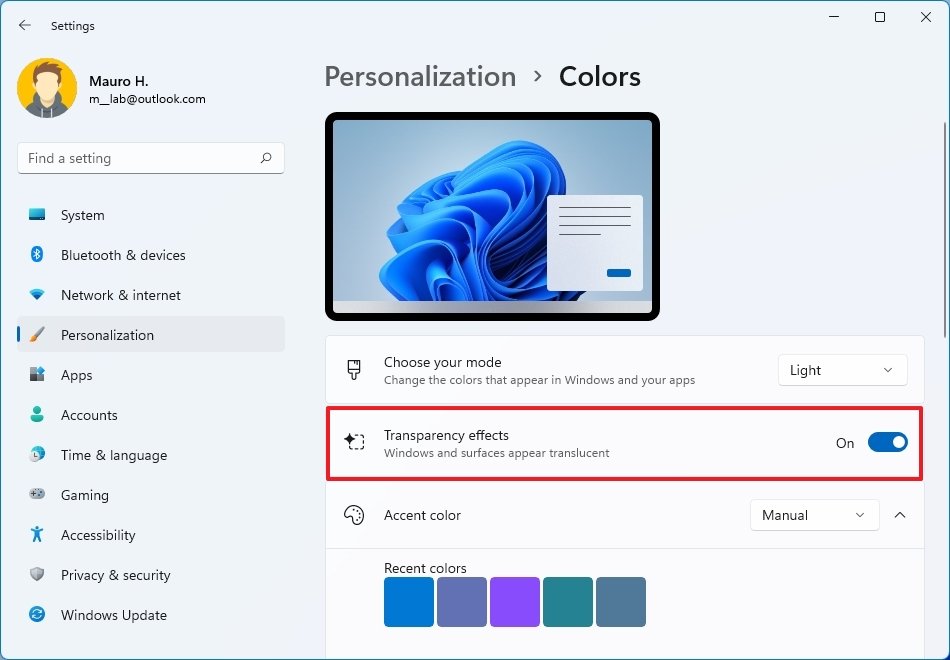
Once you complete the steps, transparency effects will be available according to your option.
Configure custom color emphasis
To employ a custom color accent to your Windows 11 experience, use these steps:
- Open Settings.
- Click on Personalization.
- Click the Colors page on the right side.
- Apply the "Accent color" setting and select the Manual choice.
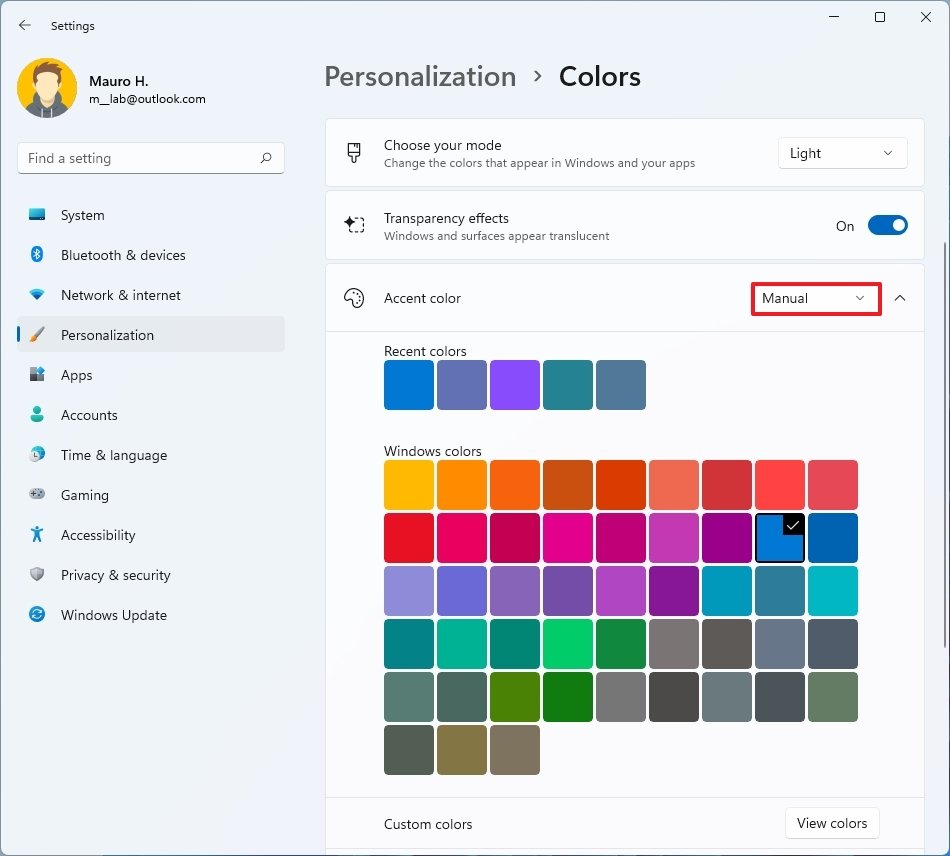
- Select a custom accent color.
- (Optional) Click the View colors button for the Custom colors setting.
- Create a custom color.
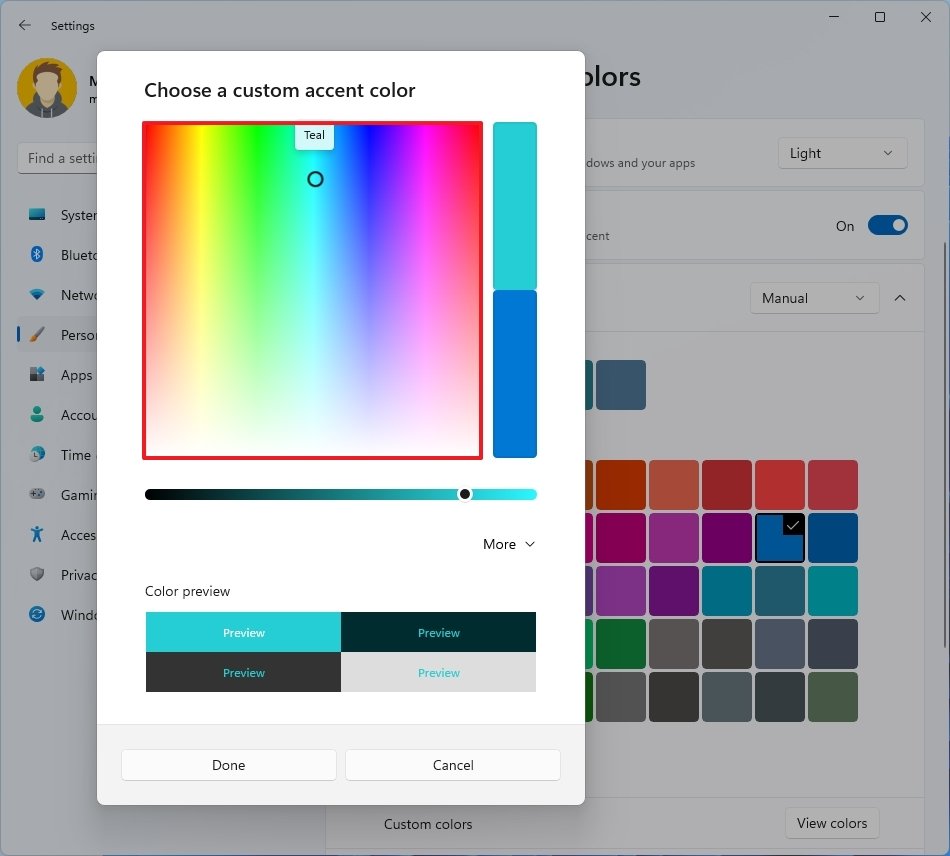
- Click the Done button.
- (Optional) Apply the "Accent color" setting and select the Automatic option to allow the system to use a colour based on the colors of the current desktop background.
After you complete the steps, system icons, links, buttons, and many other elements will reflect the new automated color.
Show accent color on Kickoff carte and Taskbar
If you desire the Start menu, Taskbar, Notification Center and Quick Settings, and other elements to use the aforementioned color scheme, instead of the organisation color mode, utilise these steps:
- Open Settings.
- Click on Personalization.
- Click the Colors page on the right side.
- Use the "Accent color" setting and select the Transmission pick.Quick tip: You tin also employ the Automatic choice.
- Select a custom emphasis colour.
- Utilise the "Cull your mode" setting and select the Dark or Custom option.Quick tip: If y'all use the custom option, brand sure to utilise the Dark option for the "Choose your default Windows mode" option.
- Nether the "Accent color" setting, turn on the Show accent color on Start and taskbar toggle switch.
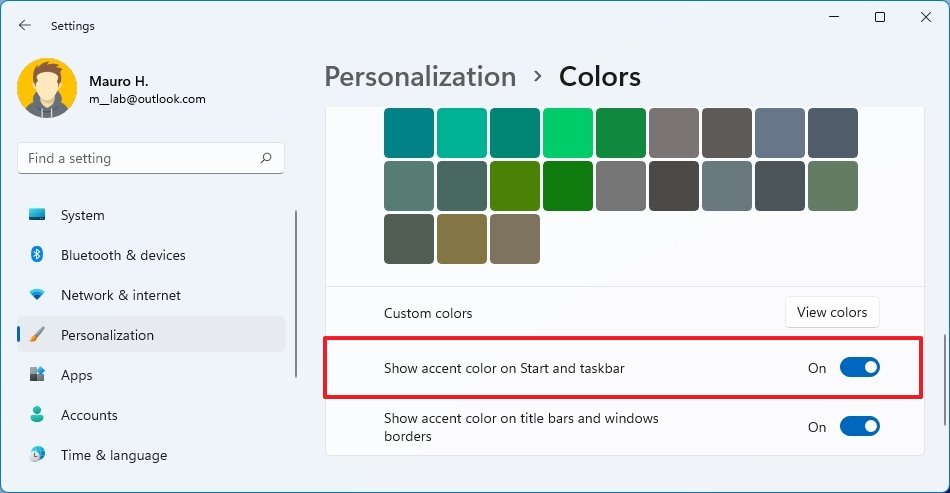
- (Optional) Turn on the Show accent color on title confined and windows borders toggle switch to show the accent color in borders and title bars (except in File Explorer).
One time you lot complete the steps, the Start carte, Taskbar, and other visual elements will at present use the colour accent you selected in the settings.
Evidence accent colour on title bars and borders
To enable accent color for title bars and borders, use these steps:
- Open Settings.
- Click on Personalization.
- Click the Colors page on the right side.
- Plough on the Show accent color on championship bars and windows borders toggle switch to allow the accent colour to show in borders and title bars.
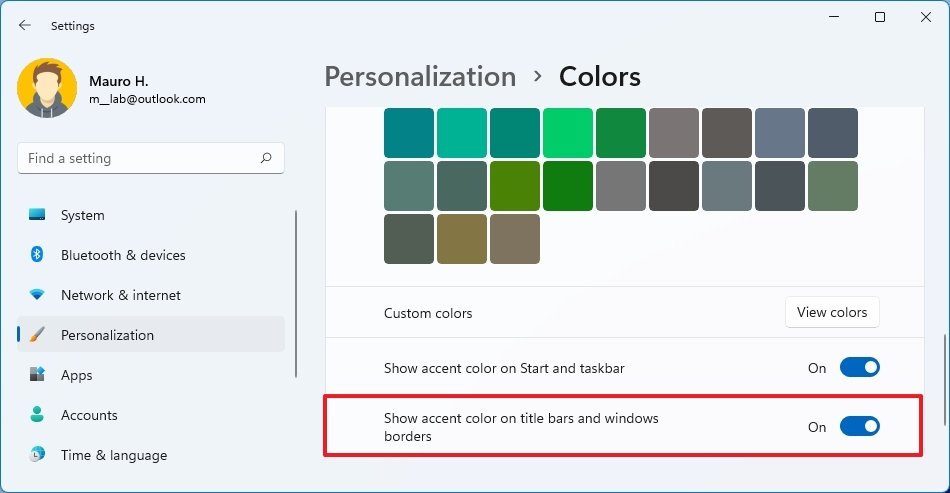
After you complete the steps, the accent color volition show in the application's border frames and title bars (except in File Explorer).
How to change themes on Windows 11
A theme is a bundle that includes ane or more than background images, emphasis colour, mouse pointer customizations, and in some cases, sounds, and you tin go them from the Microsoft Store (most of them are free, and others are paid).
Modify themes
To change the desktop theme, employ these steps:
- Open up Settings.
- Click on Personalization.
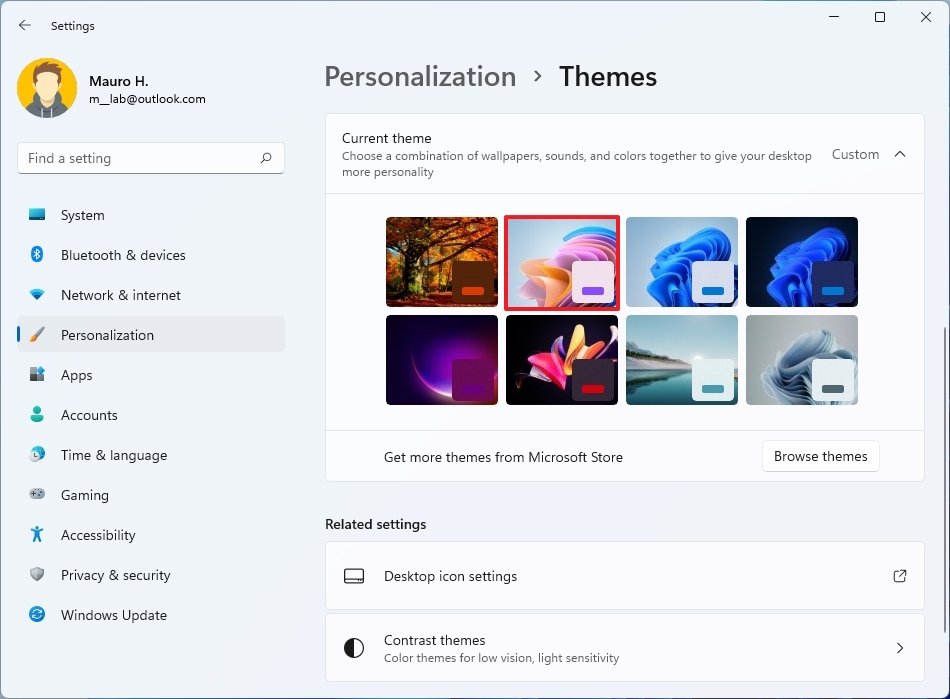
- Click the Themes page on the correct side.
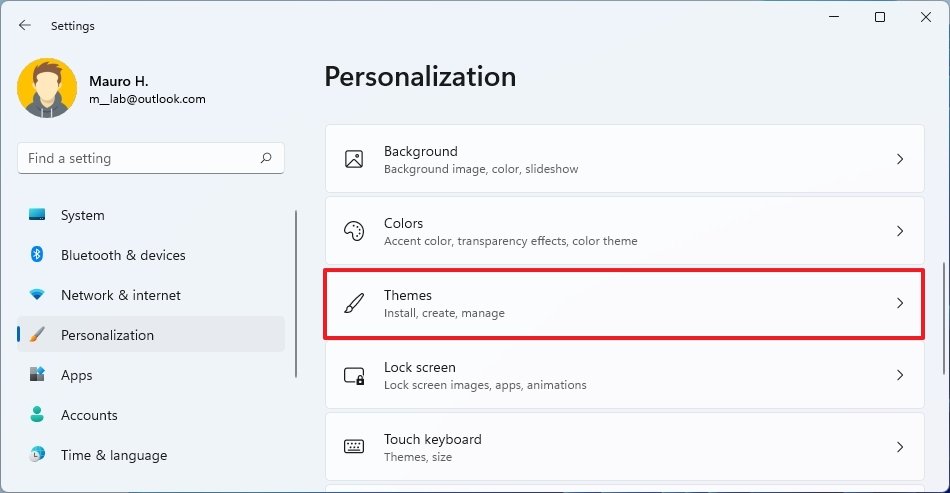
- Nether the "Current theme" setting, select one of the available themes.Quick notation: Windows xi comes with six default themes with different wallpapers and settings, including Windows (light), Windows (dark), Glow, Sunrise, and Flow.
Once you complete the steps, the theme volition apply to your computer.
Download themes
To get new themes for your Windows 11 desktop, use these steps:
- Open up Settings.
- Click on Personalization.
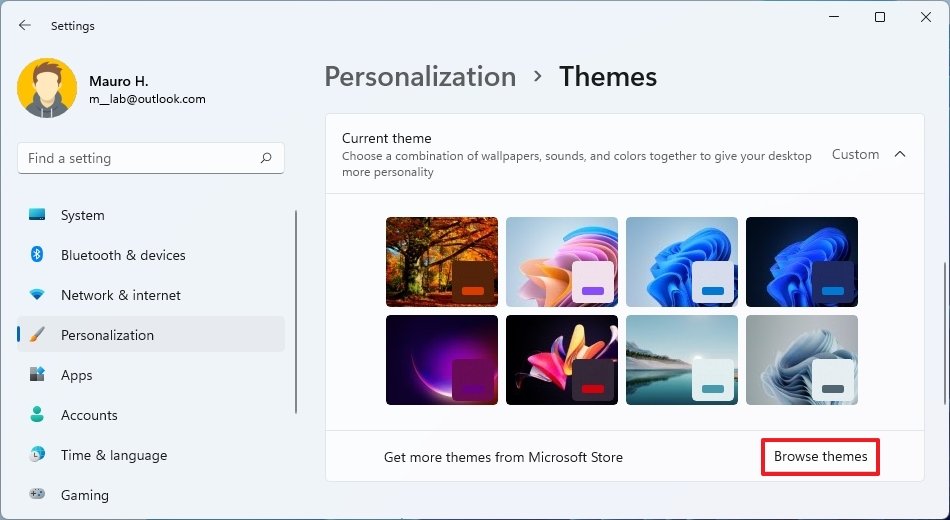
- Click the Themes page on the right side.
- Under the "Current theme" setting, click the Browse themes button.
- Select the Windows eleven theme from the Microsoft Store.
- Click the Get (or Install) button.
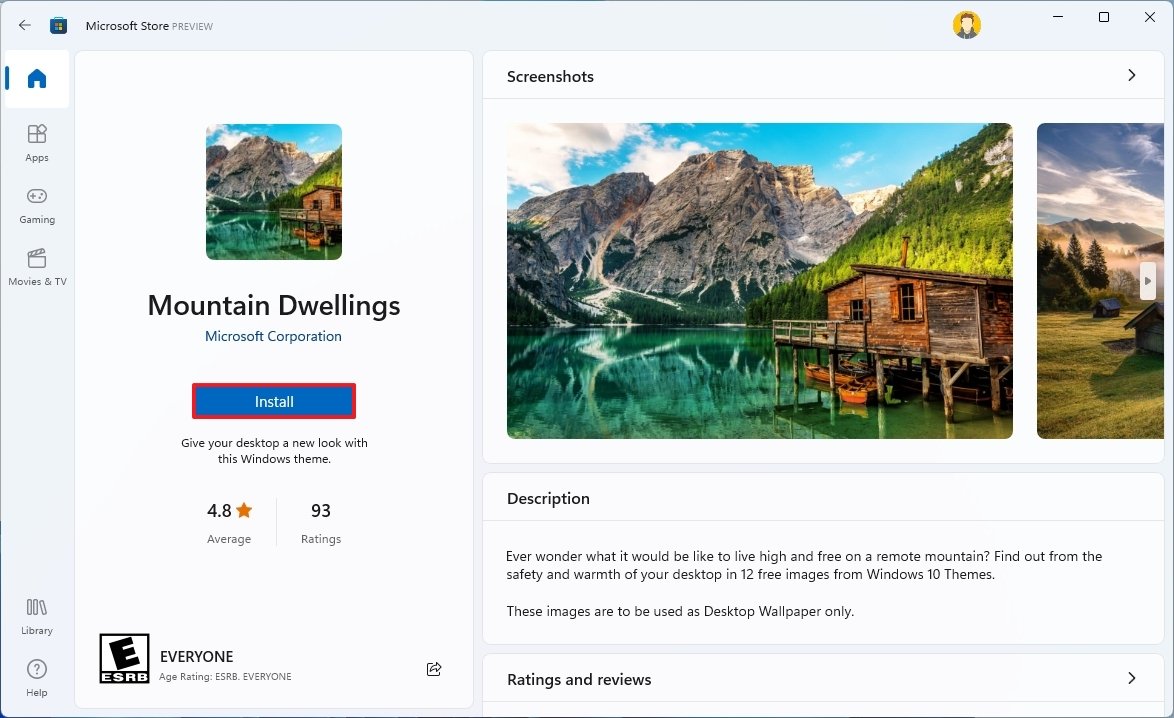
- Click the Open push.
- Select the newly installed theme to apply it.
Afterward you complete the steps, the newly downloaded theme will be reflected on the desktop and across the experience.
Contrast themes
Equally part of the accessibility feel, Windows eleven also offer four different high contrast themes. Although these themes are reserved for individuals with depression vision, anyone can use the themes.
To switch to one of the contrast Windows 11 themes, use these steps:
- Open up Settings.
- Click on Accessibility.
- Click the Contrast themes page on the correct side.
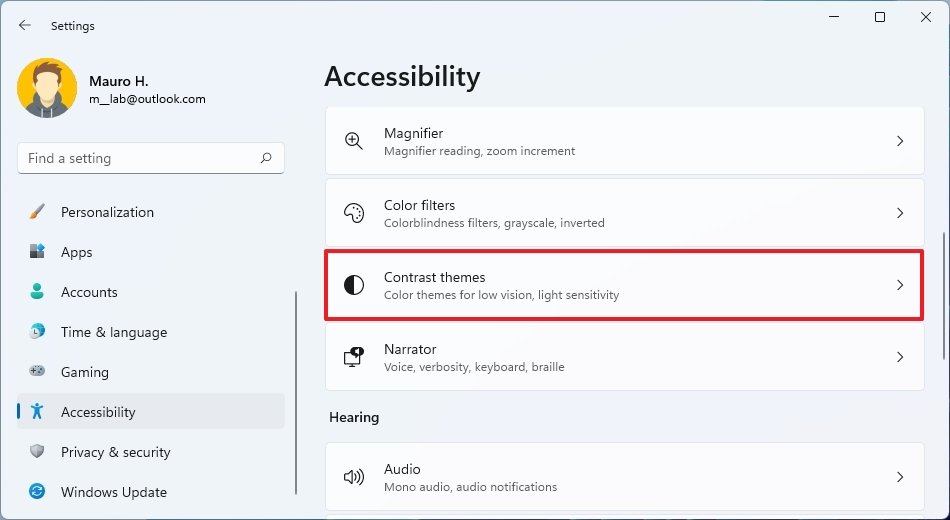
- Under the "Contrast themes: setting, select one of the available themes, including:
- Aquatic.
- Desert.
- Dusk.
- Nighttime heaven.
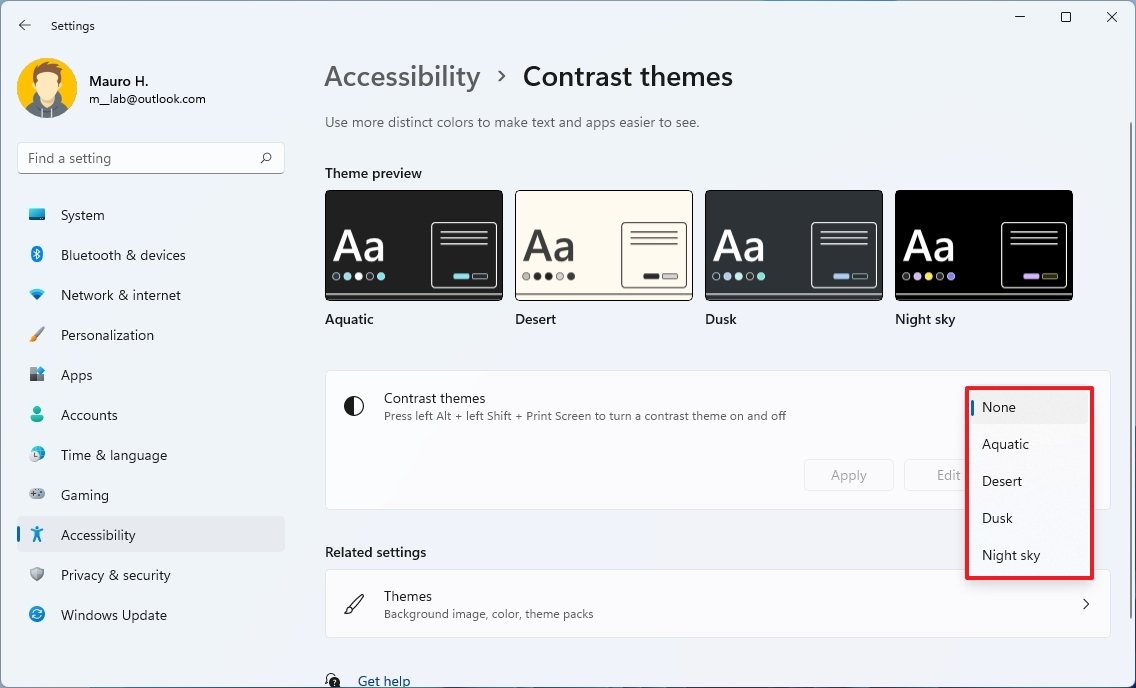
- (Optional) Utilise the Left Alt key + Left Shift cardinal + Print screen keyboard shortcut to enable or disable the contrast theme.
Once you complete the steps, the Windows experience will switch to the high contrast mode.
On Windows 11, the Start menu is an essential component to launch apps and find near anything on your calculator, including apps, settings, and files, and you lot tin customize it in many different means.
Change Start settings
To customize the Windows 11 Starting time menu settings, use these steps:
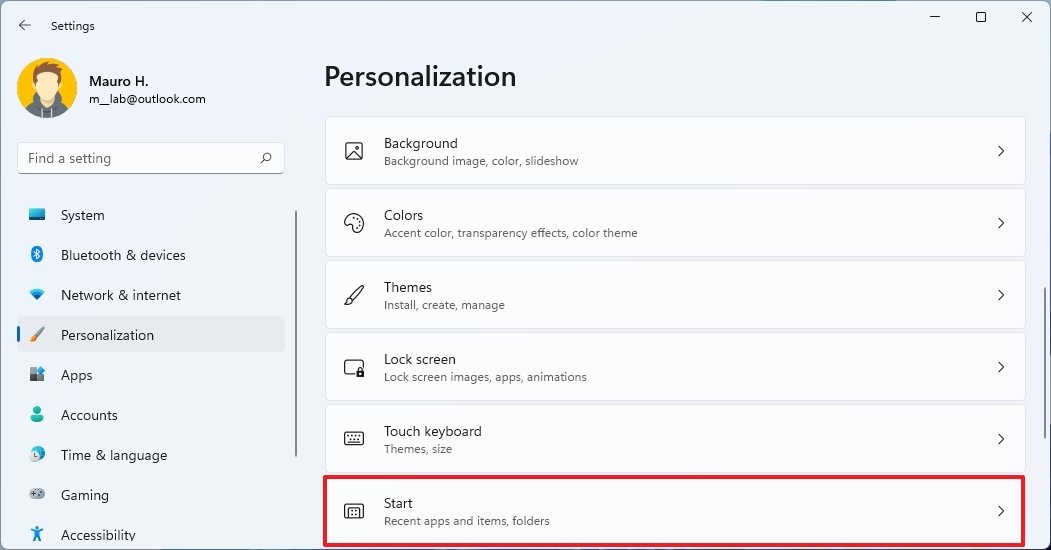
- Open up Settings.
- Click on Personalization.
- Click the Start page on the right side.
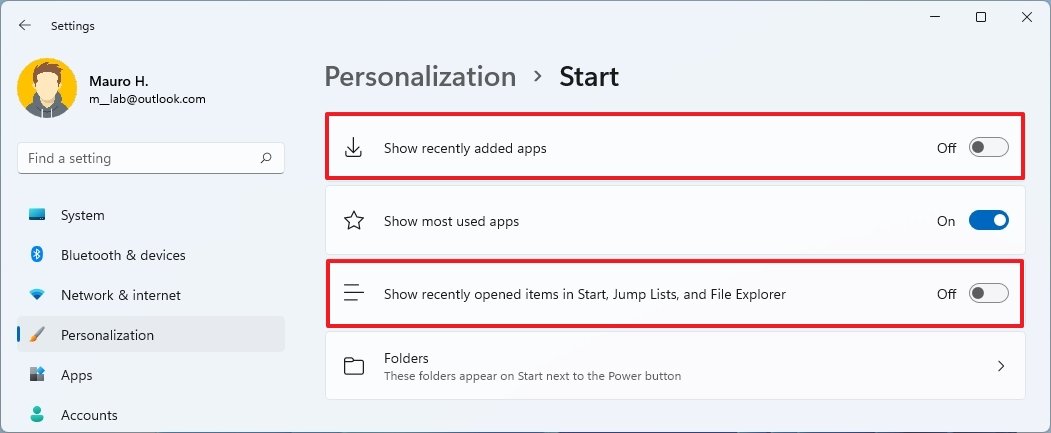
- Turn on or off the Prove recently added apps toggle switch.
- Plough on or off the Bear witness most used apps toggle switch.
- Turn on or off the Show recently opened items in Start, Jump Lists, and File Explorer toggle switch.
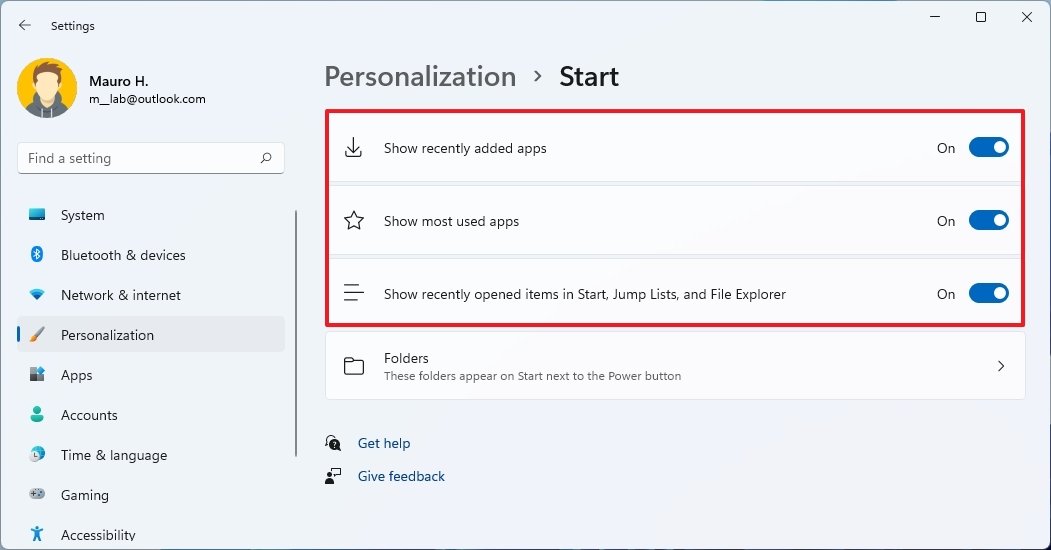
When enabling the recently added or virtually used apps options, the Start menu volition show these items in the "Recommended" department and the "All apps" listing.
Add together or remove Folders on Start
To add or remove quick access to different locations similar Documents, Downloads, etc., through the Commencement menu, use these steps:
- Open Settings.
- Click on Personalization.
- Click the Offset page on the right side.
- Select the Folders setting.

- Turn on or off the items to appear adjacent to the power push in Starting time.
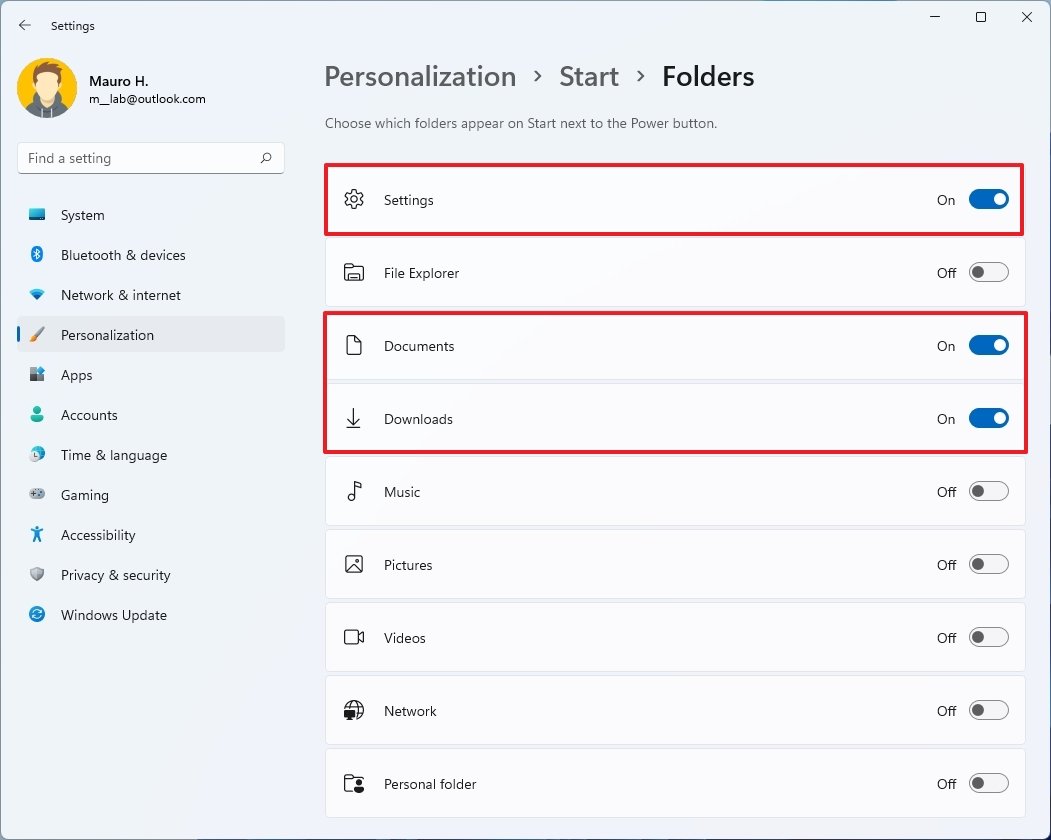
Later you complete the steps, the quick admission buttons will appear next to the power push in the Start menu.
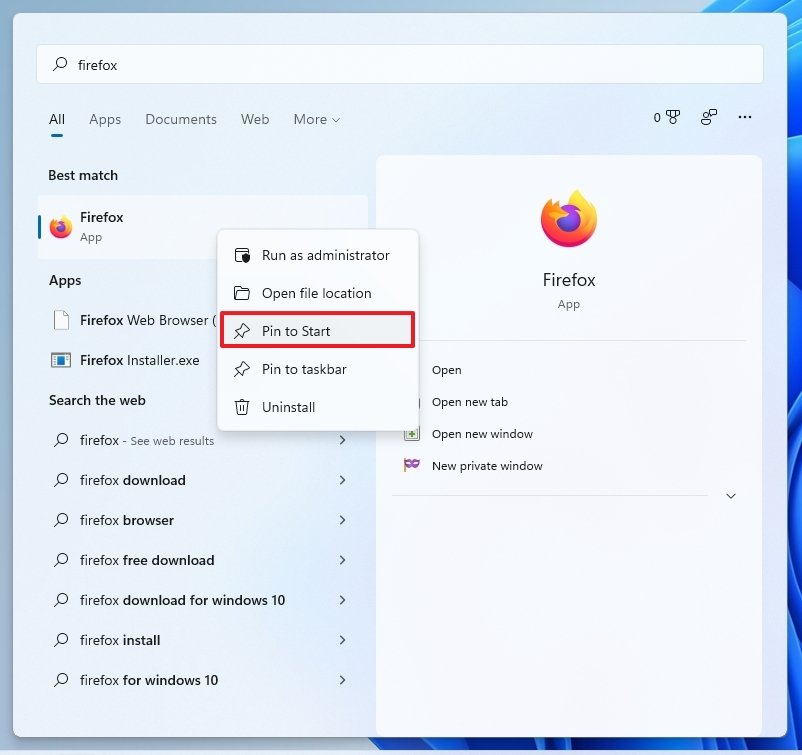
Pin apps to Start
To organize the Pinned department of the Outset menu, utilize these steps:
- Open Start.
- Search for the name of the app in Windows Search.
- Right-click the app and select the Pivot to First option.
- (Optional) Right-click the app from the "Pinned" section and select the Motion to top pick to position the detail in the acme-left corner.
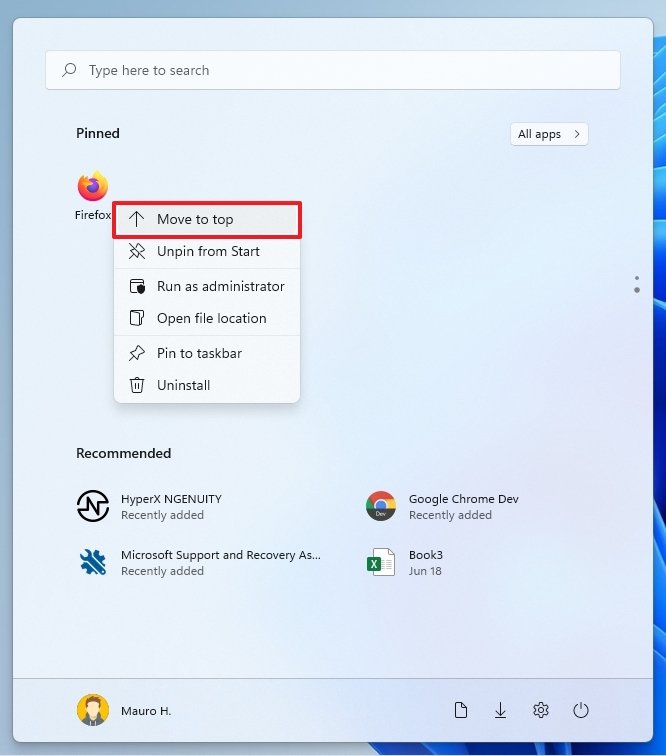
- (Optional) In the "Pinned" department, drag the particular to your desired position.
If you don't want a particular app in the Pinned department or want to go rid of it, correct-click the app and select the Unpin from Offset or Uninstall push. If this is a Microsoft Store app, the app will be removed without farther steps. If this is a classic app, you may demand to continue with the on-screen directions to complete the uninstall process.
Customize Recommended department on Start
The "Recommended" section is where you will detect suggestions of recently opened files and installed apps. This area holds upwardly to half dozen items, simply you can click the More button to admission more content (if applicative). Although y'all cannot remove this feature, you lot can customize information technology to arrive more comfortable.
Remove Recommended items
To remove items from the Recommended section individually, use these steps:
- Open Get-go.
- Under the "Recommended" department, right-click the particular and select the Remove from listing option.
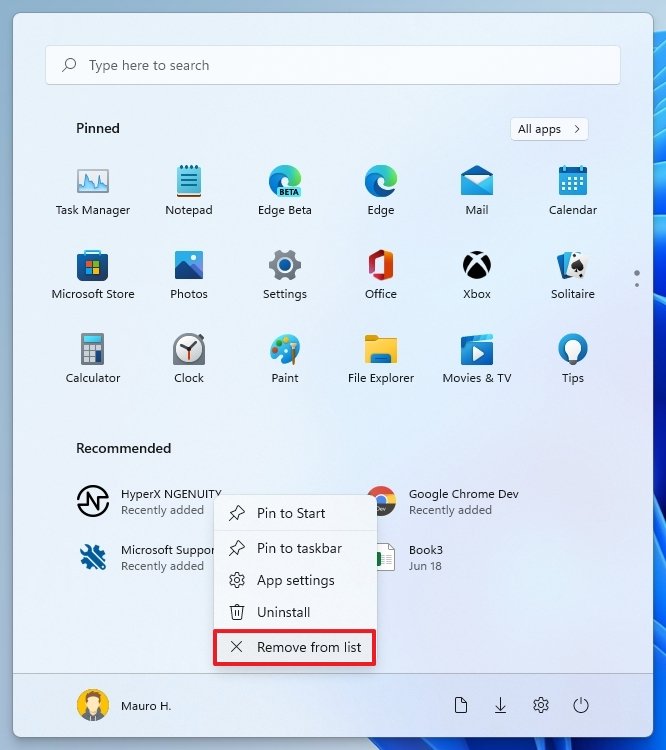
One time you lot consummate the steps, the item you selected will be removed from the Start menu.
Disable Recommended section
To foreclose content from showing in the Recommended section, use these steps:
- Open Settings.
- Click on Personalization.
- Click the Commencement page on the right side.
- Turn off the Show recently added apps toggle switch.
- Turn off the Show recently opened items in Start, Spring Lists, and File Explorer toggle switch.
After yous consummate the steps, the Recommended section volition no longer show any items. Still, since yous disable recently added apps and opened items, the recently added apps listing will no longer appear in the All apps list, Bound Lists for apps in the Taskbar, and the Quick access page in File Explorer will no longer show recently opened items.
How to customize Taskbar on Windows 11
The Taskbar on Windows 11 isn't as customizable as in previous versions, but you can nevertheless manage various settings to adjust the expect and feel. You lot tin can change the alignment of items, remove the system items yous don't utilise, and manage various settings from the organization tray.
Alter alignment of icons
To marshal the Taskbar buttons and Start menu to the left, use these steps:
- Open Settings.
- Click on Personalization.
- Click the Taskbar folio on the right side.
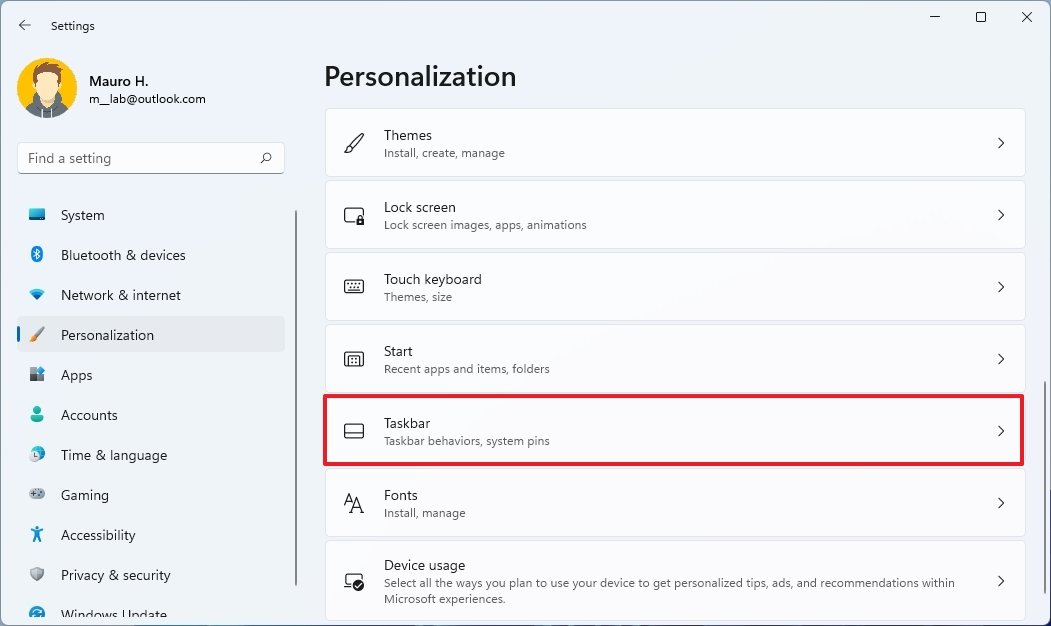
- Click the Taskbar behaviors setting.
- Apply the "Taskbar alignment" setting and select the Left selection.

Once you complete the steps, the Taskbar items, including the Start menu, volition shift the alignment to the left. If you lot want the items centered, use the instructions outlined above, but on step 5, select the Center option.
Add or remove system app icons
To customize the system app icons that appear next to the Start bill of fare, use these steps:
- Open Settings.
- Click on Personalization.
- Click the Taskbar page on the right side.
- Use the "Taskbar items" setting and turn off the items you lot don't want to run across in the Taskbar, including:
- Search.
- Chore view.
- Widgets.
- Chat.
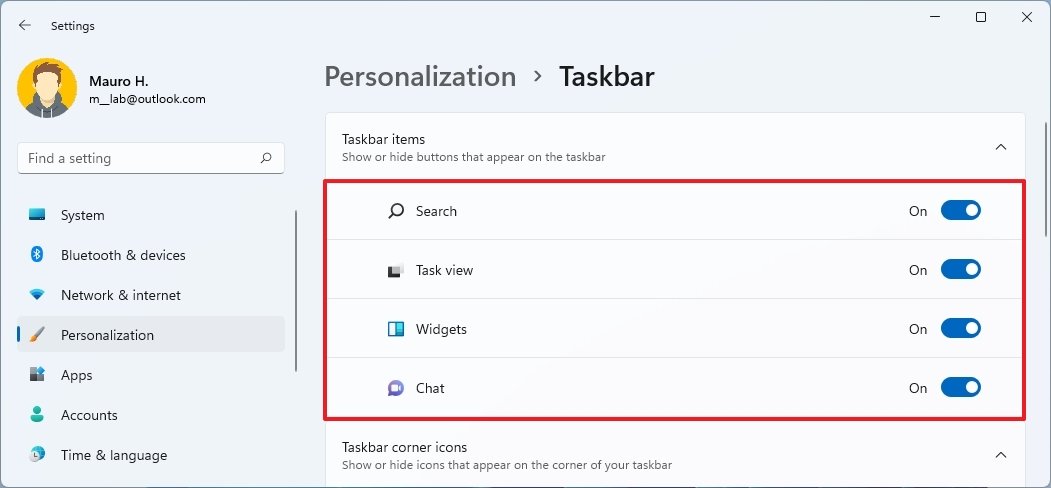
After yous consummate the steps, the organisation app icons y'all disabled will no longer appear in the Taskbar.
Add together or remove corner icons
To decide the icons that announced in the organization tray, use these steps:
- Open Settings.
- Click on Personalization.
- Click the Taskbar page on the right side.
- Apply the "Taskbar corner icons" setting and plough off the items you don't want to see in the system tray, including:
- Pen carte du jour.
- Impact keyboard.
- Visual touchpad.
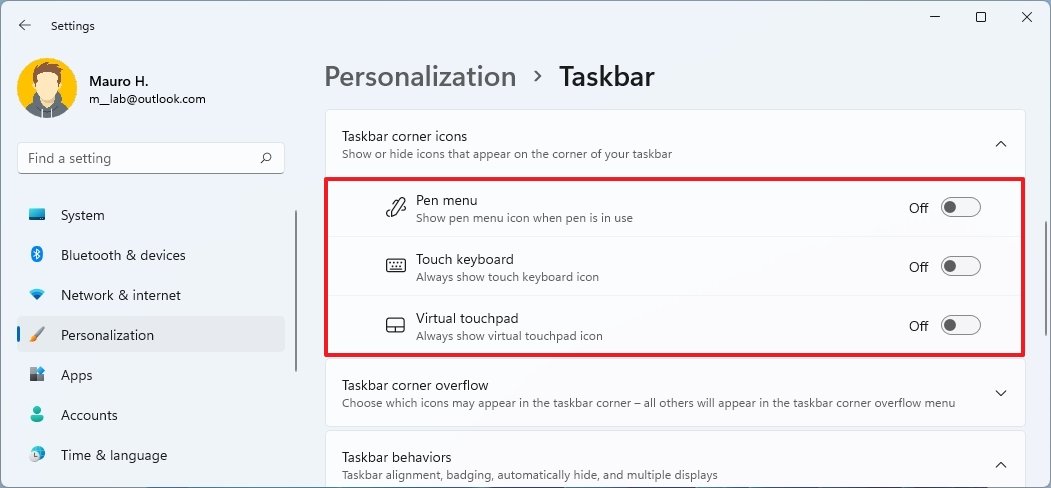
One time you complete the steps, only the icons y'all enabled will appear in the organisation tray of the Taskbar.
Change corner overflow settings
To bear witness or hide items from the Taskbar overflow, use these steps:
- Open Settings.
- Click on Personalization.
- Click the Taskbar page on the right side.
- Use the "Taskbar corner overflow" setting and turn off the app icons you don't want to meet in the organisation tray — for example, OneDrive, Microsoft Teams, and Windows Update Condition.
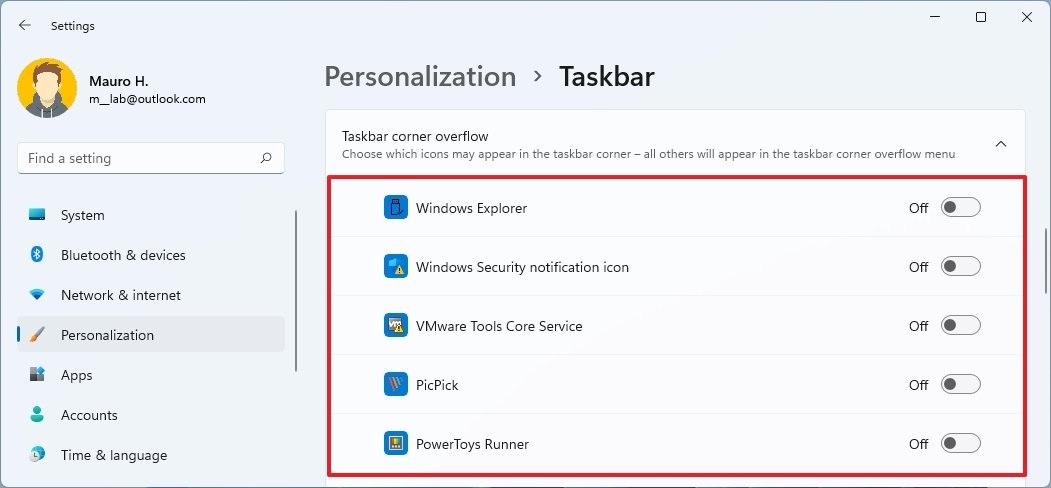
After y'all complete the steps, just the items enabled will appear outside the overflow flyout.
To make up one's mind whether apps should display badge counters for unseen letters, use these steps:
- Open Settings.
- Click on Personalization.
- Click the Taskbar page on the right side.
- Click the Taskbar behaviors setting.
- Bank check or articulate the Show badges (unread messages counter) on taskbar apps selection to enable or disable the unseen messages counter.
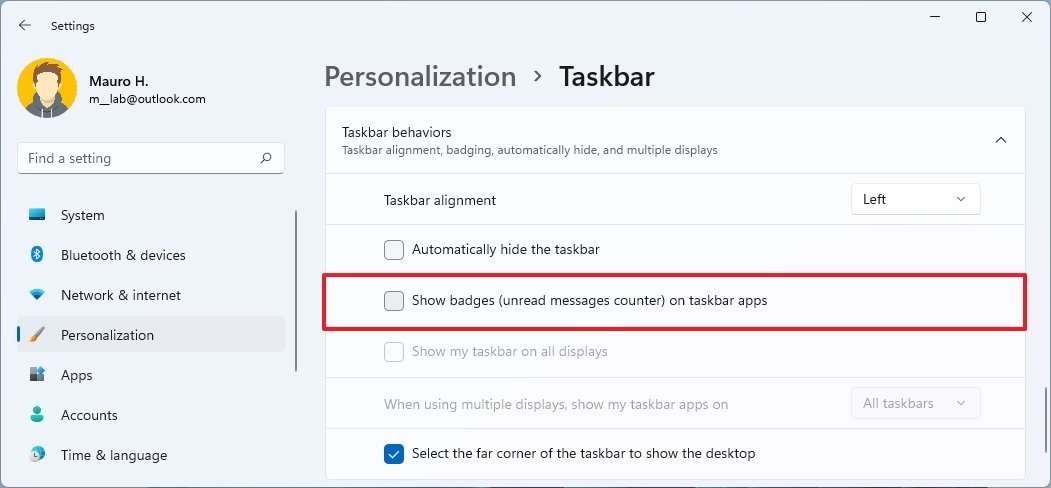
One time you complete the steps, the badge counter volition appear, depending on your configuration.
To hide the Taskbar automatically on Windows 11, use these steps:
- Open Settings.
- Click on Personalization.
- Click the Taskbar page on the right side.
- Click the Taskbar behaviors setting.
- Check the Automatically hide the taskbar option.
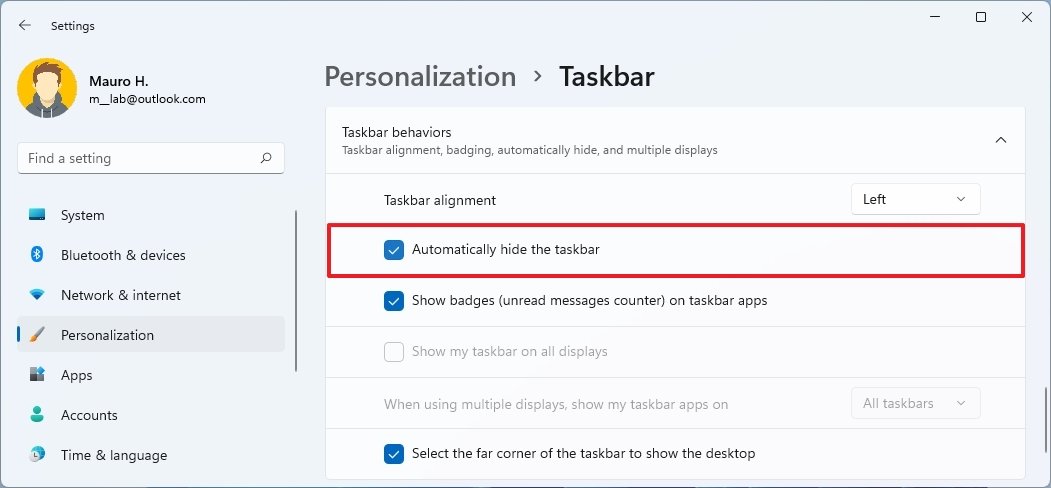
After you consummate the steps, the Taskbar will hibernate automatically as you move the mouse arrow away.
Evidence Taskbar on all monitors
To permit the Taskbar to announced on all monitors, use these steps:
- Open up Settings.
- Click on Personalization.
- Click the Taskbar page on the correct side.
- Click the Taskbar behaviors setting.
- Check the Show my taskbar on all displays option.
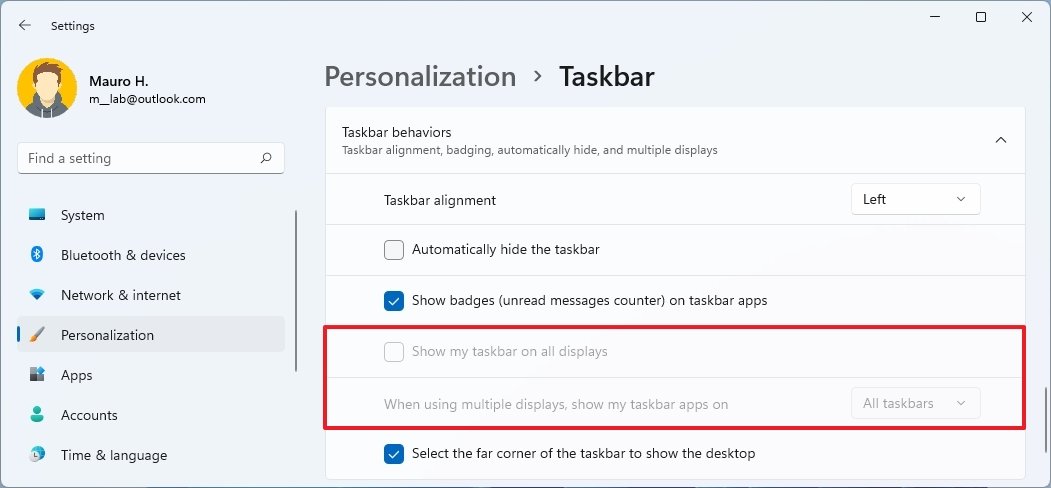
This option is but available when yous have multiple monitors connected to the computer.
Enable or disable desktop button
To disable or enable the pick to show the desktop on Windows 11, use these steps:
- Open Settings.
- Click on Personalization.
- Click the Taskbar page on the correct side.
- Click the Taskbar behaviors setting.
- Check or clear the Select the far corner of the taskbar to testify the desktop option.
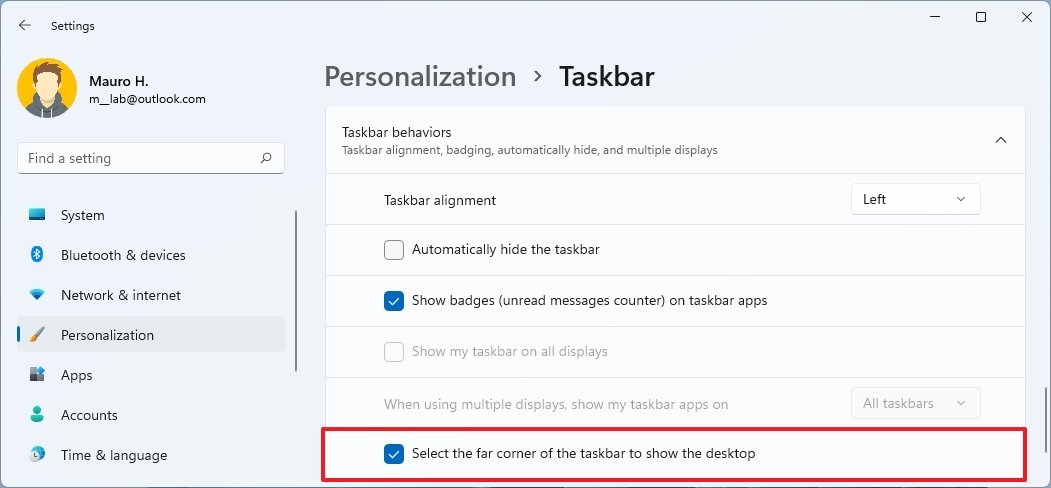
Once you consummate the steps, the button to bear witness or hide the desktop will no longer exist available in the Taskbar.
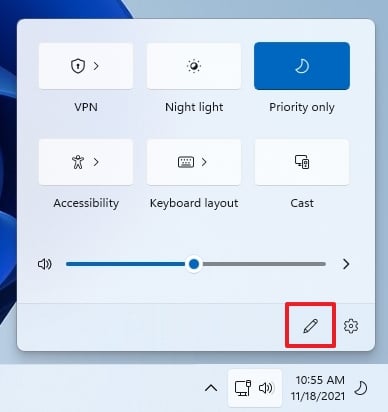
Customize Quick Settings flyout
To add or remove items from the Quick Settings flyout, utilize these steps:
- Click the network and volume push button.Quick tip: You can also use the Windows key + A keyboard shortcut to open the flyout.
- Click the Edit Quick Settings (pen) push.
- Click the Add together button.
- Select the item you want to add together.
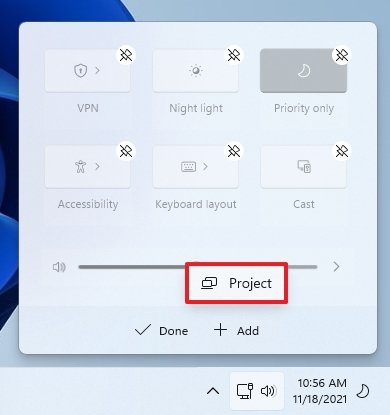
- Click the Unpin push to remove an detail from the list.
- Click and elevate an item to the position y'all want.
- Click the Done push.
Later you complete the steps, Quick Settings will have the options in the order you like them.
How to customize Lock screen on Windows 11
You can besides customize the Lock screen, which is the screen that slides up every time y'all need to get to the Sign-in screen on Windows 11.
Set up custom epitome on Lock screen
To use a custom image on the Lock screen, use these steps:
- Open Settings.
- Click on Personalization.
- Click the Lock screen page on the right side.
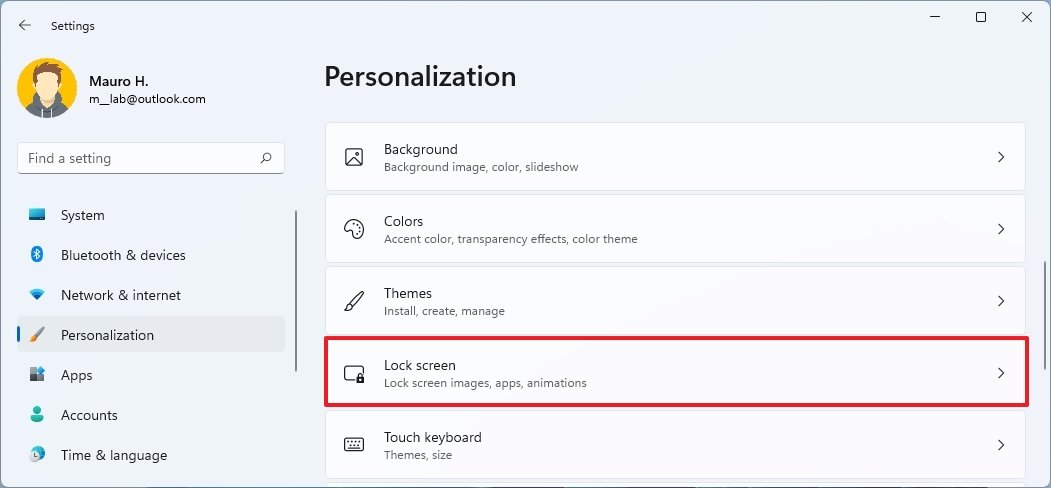
- Use the "Personalize your lock screen" setting and select the Picture choice.
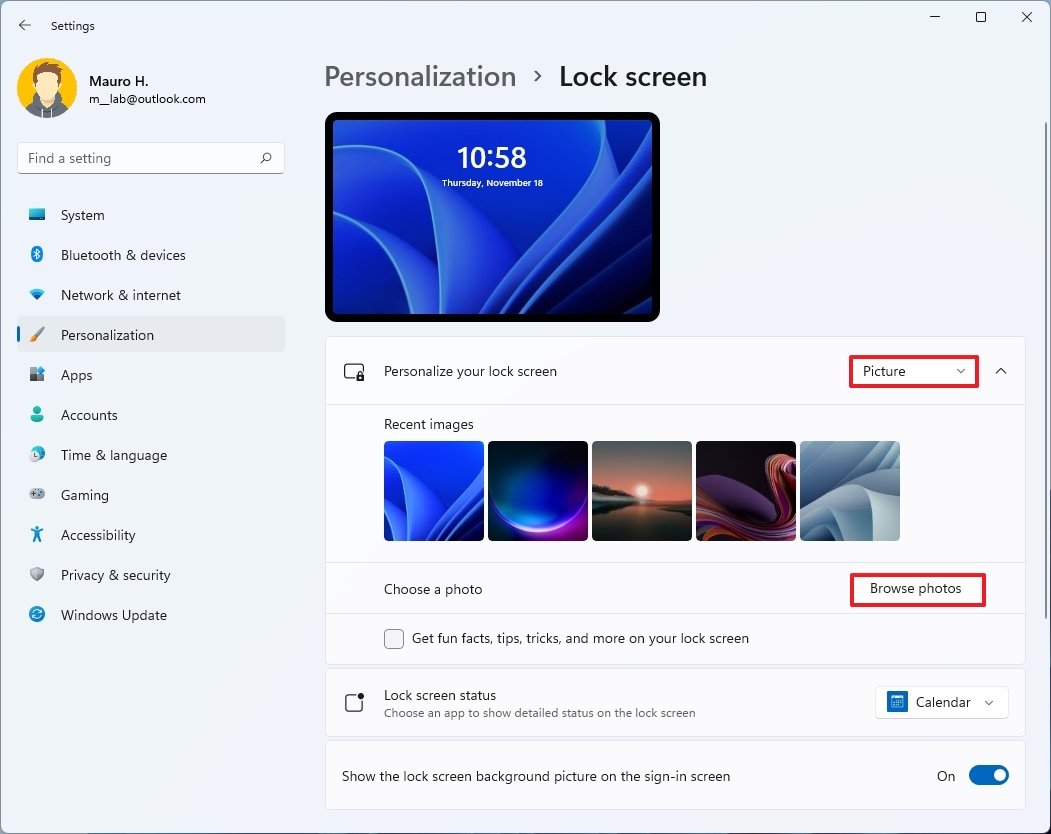
- Click the Browse photos push button.
- Select the custom paradigm.
- Click the Choose picture show button.
- (Optional) Clear the Go fun facts, tips, tricks, and more on your lock screen option.
Once you consummate the steps, the Lock screen will testify the image you selected in the settings.
Set slideshow on Lock screen
To use a custom slideshow on the Windows eleven Lock screen, use these steps:
- Open up Settings.
- Click on Personalization.
- Click the Lock screen folio on the right side.
- Apply the "Personalize your lock screen" setting and select the Slideshow selection.
- Click the Browse button.Quick annotation: Windows eleven adds the local Pictures folder and Pictures binder from OneDrive by default. You tin can use these locations, or you can remove them to add other folders.
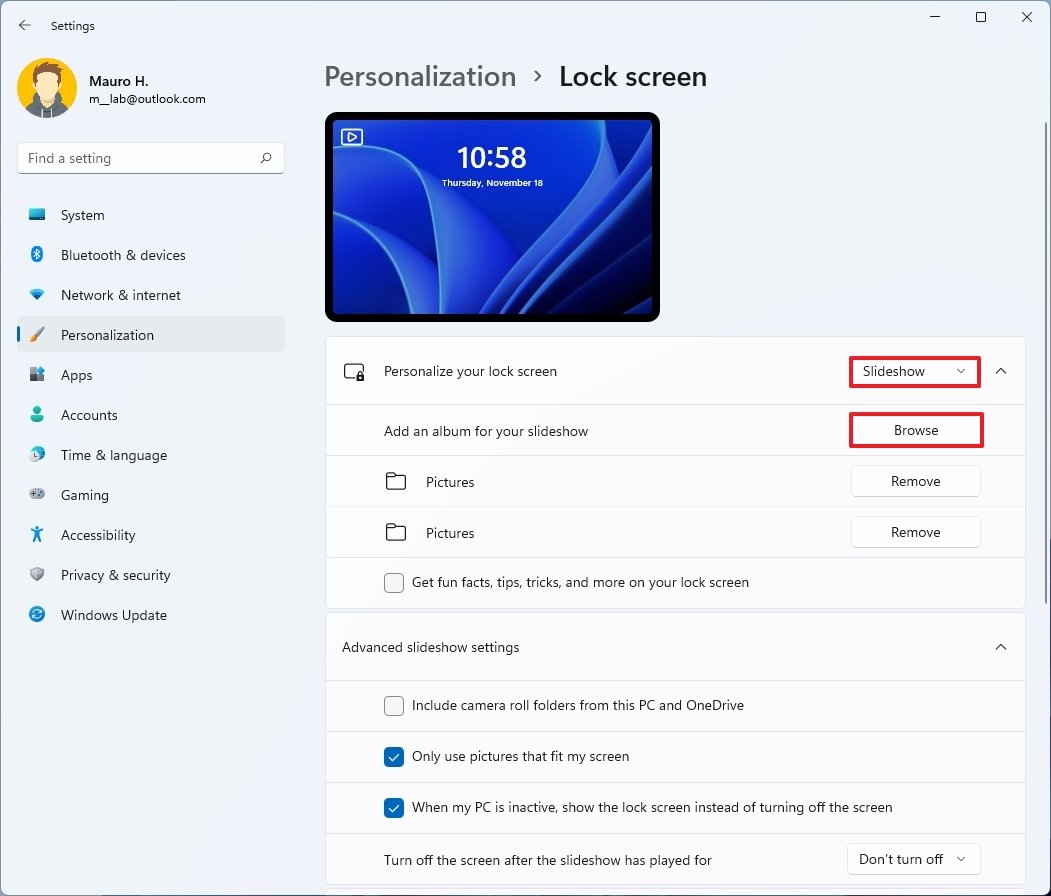
- Select the folder with all the images.
- Click the Choose picture push.
- Click the Choose this folder push button.
- (Optional) Articulate the Get fun facts, tips, tricks, and more on your lock screen option.
After you complete the steps, the Lock screen will rotate the pictures from the folder yous selected in the settings equally y'all start the estimator.
Set Windows Spotlight on Lock screen
The Windows Spotlight feature is the default experience for the Lock screen, just if you were using something different or want to revert the changes, use these steps:
- Open Settings.
- Click on Personalization.
- Click the Lock screen page on the correct side.
- Use the "Personalize your lock screen" setting and select the Windows Spotlight option.
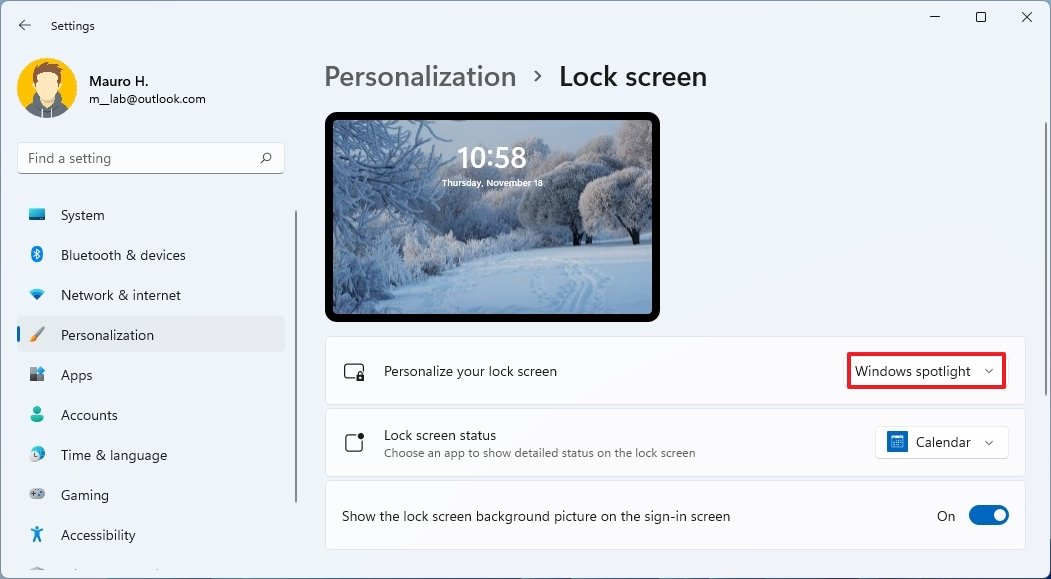
Once you complete the steps, yous will encounter new fresh images from Microsoft Bing every time y'all are on the Lock screen.
Configure apps notifications on Lock screen
To view notifications from apps on the Lock screen, use these steps:
- Open Settings.
- Click on Personalization.
- Click the Lock screen page on the right side.
- Apply the "Lock screen condition" setting and select the information y'all want to see — for example, weather, post, or calendar.
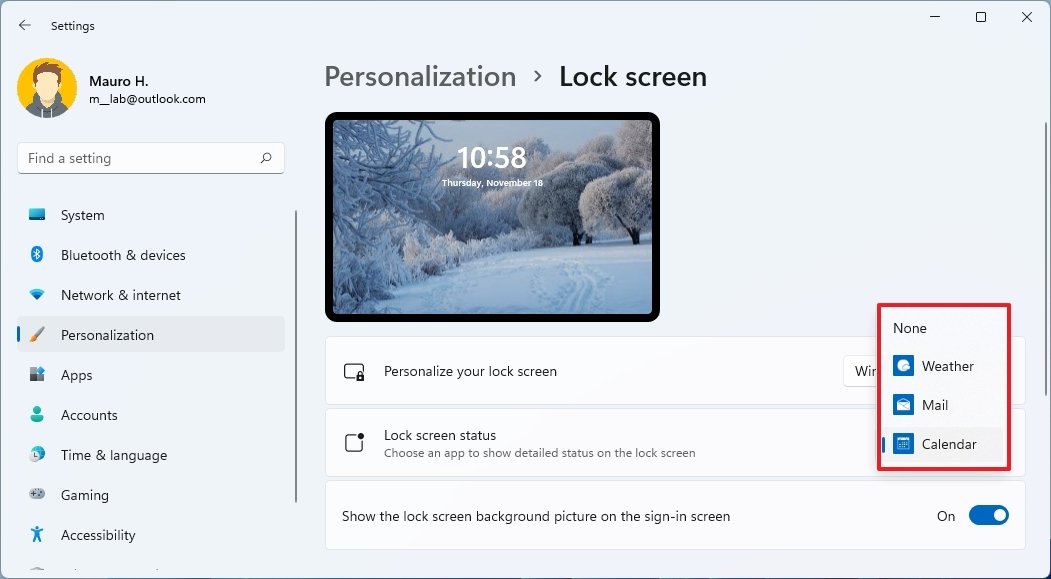
After you consummate the steps, the Lock screen volition testify notifications of the app you lot specified.
Disable background on Sign-in screen
Windows 11 utilise the same background on the Lock and Sign-in screens, merely you can disable this behavior if y'all only desire to show a solid color background.
To disable the Sign-in screen background, utilize these steps:
- Open Settings.
- Click on Personalization.
- Click the Lock screen page on the right side.
- Turn off the Bear witness the lock screen background movie on the sign-in screen toggle switch.
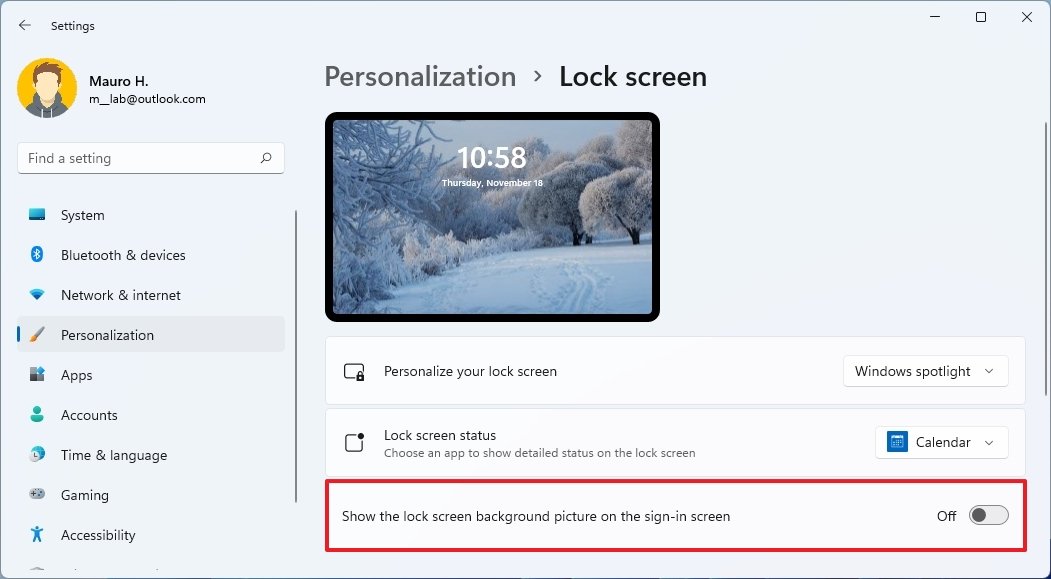
Once you complete the steps, the Sign-in screen will testify a solid color background.
Things yous can no longer customize on Windows 11
Although y'all yet have many different ways to customize the wait and feel of Windows 11, a lot has changed in this version, and there are many customizations you lot were able to use in the previous version, and now, they are no longer available.
Here's a list of visual and functional customization options that Microsoft has removed from Windows 11.
Taskbar
- The Taskbar is now locked at the bottom of the screen, which ways you lot can no longer place information technology at the top or either side of the screen.
- Removes the option to prove labels and proceed apps instances separate.
- Ditches support to drag and drop files to open them with the running application.
- Removes the pick to make icons larger or smaller.
- You can no longer adjust the tiptop of the Taskbar.
Start menu
- The Showtime carte removes support for Live tiles.
- Drops bill of fare resize support.
- Total-screen way is gone.
- You lot tin no longer create groups of apps.
- Y'all can no longer organize apps into folders.
More than Windows resources
For more helpful articles, coverage, and answers to common questions about Windows 10 and Windows 11, visit the following resources:
- Windows 11 on Windows Key — All you demand to know
- Windows eleven help, tips, and tricks
- Windows 10 on Windows Cardinal — All you need to know
Source: https://www.windowscentral.com/how-change-look-and-feel-windows-11
Posted by: quinnoloplath.blogspot.com
0 Response to "How To Change The Color Of Your Home Bar Wwindows"
Post a Comment